PLASTER WORK.
1.PLASTER
2.NEIL ENGLAND MASTER PLASTERER
3.STUCCO
4.BRICKS AND MORTAR
5.BUNGAROOSH
6.CAST IRON
1.PLASTER
PLASTER OR STUCCO has been used since Roman times to cover and beautify both interior and exterior walls of both public and private buildings. As the techniques and mixes became more sophisticated more and more elaborate and ‘deep’ designs evolved .
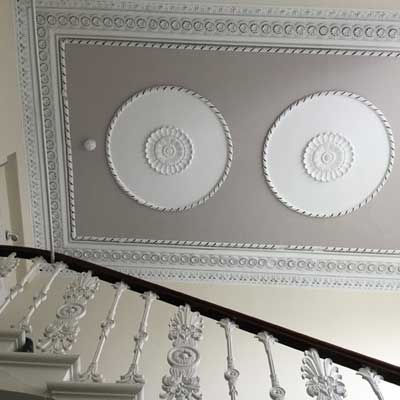
Stucco – a plaster mix of lime, gypsum and marble dust perfect for fine work – was developed by the ancient Romans to decorate ceilings, and was widely used in Europe. Influenced by the Italian Renaissance and the subsequent fashion for Baroque style(see below), Decorative plasterwork was employed to spectacular effect on the ceilings of some of Britain’s grandest houses. there is a wealth of original plasterwork still existent on the Estate
The subject of decorative plaster is really a tale of two plasters – two plasters that are often confused as one, both having the same appearance but each having very different qualities. The first, the one plaster that is usually associated with early decorative work is lime plaster. Made from lime putty, lime plaster has wonderful versatility, but its reward is gained at a price, for lime is a deceptively difficult substance to use and its behaviour is often unpredictable.
The other plaster comes from an easier to use, more popular material, a fine white powder capable of a quick predictable set. This is gypsum plaster. It is the most common material used today for plain and decorative plasterwork, but prior to cheap mass-produced gypsum plaster in the late 19th century, both gypsum and lime were used for decorative plasterwork, at times combined side by side in one decorative scheme where the two methods and materials complement each other. Indeed it is highly unusual to find early decorative plasterwork to be the product of strictly one plaster, and lime plaster was often used with an additive of gypsum to aid the set.
Lime plaster remained in widespread use for traditional vernacular buildings beyond the advent of fibrous plaster and cheap gypsum plaster, mainly because of ease of availability in the countryside.
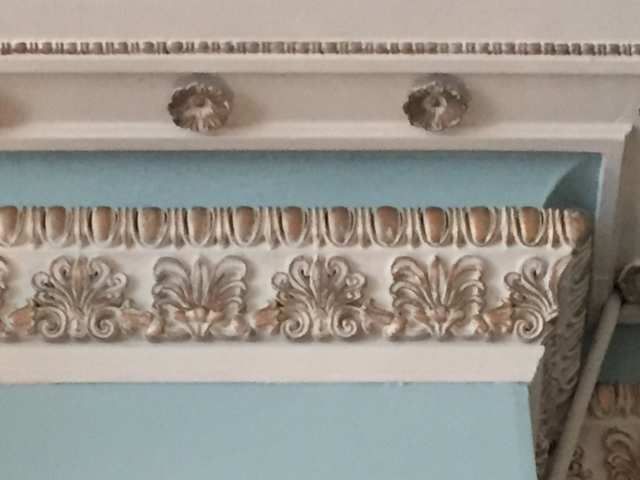
Cornices serve a practical purpose as an architectural device to cover structural joints between the walls and ceiling, and along with ceiling centres, friezes, corbels, panels, dado rails and skirtings, plaster mouldings became an art form during this era.
Cornices were put up in situ using a ‘running mould’ and plaster ‘enrichments’ (individual decorations) were added to enhance the overall effect. Lengths of ornament, or ‘runs’ are made by pushing a metal form cut to the profile of the moulding required through wet lime plaster. This profile is carried on a simple wooden frame called a ‘horse’ and it is guided by battens set out in the ceiling or walls. Alternatively, moulding can be run in much the same way but on the bench, for fixing to the ceiling or wall later. Sections of runs are then cut for corners, mitres and awkward returns, and fixed in position with nails or screws and fresh plaster used as an adhesive.
Repeated ornament is cast in the workshop using moulds, traditionally of hard material such as lead or boxwood, lead moulds being cast from a hand-modelled plaster original, boxwood being carved in the reverse. The moulds, which are usually of one piece, are coated with a releasing agent such as olive oil. The stiff but pliable lime plaster is then forced into it and left until firm enough to be removed. If no gypsum has been added, this may take around five days. On partially setting, the ornament is pulled out for final attention with the modelling tool.hman named Desachy patented fibrous plaster, a lime-free mix that incorporated flimsy sheets of hessian to add strength. Much lighter than solid plaster, fibrous plaster makes it possible to cast complete lengths of cornice and various other items together in one prefabricated piece. There is a wealth of original plasterwork still existent on the Estate with some patterns to be seen in several houses.
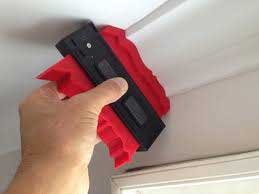
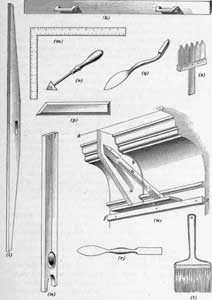
This modern wood and metal running mould has the shape of the cornice and is used to repeat the style of the moulding that is being copied; dating back to Victorian times, original moulds include popular patterns such as egg and dart, gothic arches, Greek key, dental edging and modillion blocks.
Skirting not only covered that between the walls and floor but helped protect plaster walls from impact and dado rails from chairs. Although timber has remained the material of choice for skirting throughout the ages Thomas Cubitt favoured stone or concrete with a specific high measurement to be seen in most of the houses he built;
When fibrous plaster was combined with the use of the flexible gelatine moulds, first shown at the Great Exhibition of 1851, a vast array of decorative details could be mass produced
After the introduction of mass-produced reinforced fibrous-plaster mouldings, plasterwork became ever more ornate, as prefabricated mouldings could be made and installed by general tradesmen.
While moulds made it possible to produce decorative runs in quantity, any deeper recessed work had either to be made by hand or by using several small moulded pieces applied in situ by hand.
Modelling for decorative work is made up in many layers in much the same manner as for flatwork. To minimise shrinkage, graded sands of various particle sizes are added to lime putty for each layer: coarse sand is used for the hidden core and a very small proportion of fine sand is added for the top layer. On the Continent, hair of differing strength and thickness is also added for reinforcement; coarse cattle hair for the base layer and fine goat hair for the finish coat.

Plaster additives used for decorative work are legion. The setting time of lime plaster can be speeded up with crystalline additives of alum and potassium sulphate, or retarded with animal glues and urine, and its strength can be increased with the mineral additives, magnesium and fluorosilicate; but there were many others, and those found in historic plasters can be difficult to identify from analysis, particularly if they are organic in origin.
As stucco is pliable while it cures and hardens, it generally requires some kind of support or reinforcement. This may simply be the wall itself or an armature set within it, particularly where the modelling is in high relief.
Confirmation that these working methods are the same as those used in the 18th century was given by the discovery in 1983 of a selection of tools, moulds and trial casts left under the floorboards at Audley End in the 18th century by Joseph Rose, the travelling Yorkshire plasterer.
2,Neil England a modern Master Plaisterer
Neil England, a master plaisterer, has spent his working life restoring or recreating plaster work of all kinds in historic houses and palaces all over the country. These include the Brighton Pavilion, the Sir John Soane House and many important buildings in Brighton including those on the Kemp Town and Brunswick Estate.
His knowledge on the subject is unsurpassed.
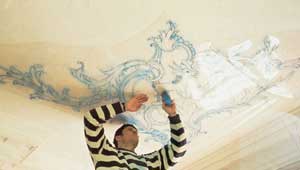
Neil was invited to create an exhibit for the Venice Biennale in 2014.
The exhibit displayed a freestanding (against a steel post) length of life-sized braced partition plastered wall showing its construction, layers of plaster and applied decorations typical of the mid 18th century. All the methods shown would have been the same in the early19th century and would have been used throughout the buildings on the Kemp Town Estate.
The exhibit took two men 9 days to complete which gives some idea of the pace of building and costs of the time. Many of the interiors of the houses on the Kemp Town Estate were built to a client’s specification and the amount of embellishment was expected to reflect the status of that client and his family.
The following is in part, a condensed version of the information catalogue produced for the exhibition. Extra material relating directly to the Kemp Town Estate has also been included
Neil England
Construction of Interiors
During the construction of the interior rooms in a house and prior to the floorboards being nailed to the joisting, a wedged post bracing system was placed beneath the joists and the entire middle section tensioned upwards. Thereafter, the floorboards and herringbone braces were nailed into the joists and the lathwork nailed to the joists beneath. The bracing was then removed and the un-lathed ceiling areas closed in, thus creating a tensioned floor capable of taking great weight without complaint or bounce. Little understood is the system of pre-bracing with the floors as has been evidenced during my time in these buildings.
Stud walls, as we would call them today, were cut and fitted in the well proven traditional method of the time with pit sawn timbers forming powerful structural frames. The frames were installed as full load bearing elements of the building and held high status within the construction.
In modern times, mistakes are often made by assuming that these frames are merely stud partitions and piercing them to form doorways/fire exits etc. Removing the diagonal bracings and stressed integrity of this feature causes the structure to reload away from the party walls, then to sag and, in some cases, internal full structural failure. (I have seen this happen on a few occasions).
Ventilation (So important).
Little is understood as to why there are ground batten timbers fixed at a point just lower than the skirting top. It was very important and served as
1.An air gap to allow air to rise from the joist voids into the partition and up into the next floor where possible (Diag bracings notwithstanding). Vital
2.A guide for the plasterer to work against
3.A fixing for the skirting
4.When then floor became damp from cleaning, moisture could not track up a porous membrane i.e. lime plaster
Skirtings.
On the lower ground floor skirtings were usually run in situ, (see 4,) But 5 times worse, sluicing with buckets of water was the norm !
The exhibit displayed a freestanding (against a steel post) length of life-sized braced partition plastered wall showing its construction, layers of plaster and applied decorations typical of the mid 18th century. All the methods shown would have been the same in the early19th century and would have been used throughout the buildings on the Kemp Town Estate.
The exhibit took two men 9 days to complete which gives some idea of the pace of building and costs of the time. Many of the interiors of the houses on the Kemp Town Estate were built to a client’s specification and the amount of embellishment was expected to reflect the status of that client and his family.
Lath
At the time lath was not hand sawn as it would have been very expensive to produce and machinery available to do the job was still scarce. Quality timber was riven whilst still green, a process of splitting wood down the grain. Oak or chestnut was usually chosen for high status buildings.
Note. Thomas Cubitt who built 37 houses on the Estate (See 13 Lewes Crescent House History) had a steam powered circular saw at his large workshop in Pimlico.
This material is a difficult product in use as it is so unpredictable and often curves on the split grain. Attempting to maintain a small finger’s width throughout, as can be seen on the exposed section, sometimes needs many adjustments. The lathwork illustrated is of green split oak, nailed up with forged nails (retrieved from ancient lost lathwork) and saved for restoration works.
The Cornices
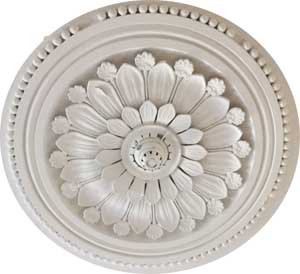
While the basis for the cornice was constructed where necessary with timber and lath, a section design was made using a ‘running horse’, run into the ceiling/wall line on running rules, pre-fixed.The more decorative and undercut elements were bench cast and applied individually. (molds and casts illustrations) Ceiling roses and other embellishments were made and applied in the same way.

Plasters
The plasters used were heavily integrated with horsehair (at least 4 kgs per cubic ton) which was teased into the plaster as it was worked in a bucket with a stick (Very time consuming) then trowelled onto the lathwork into the laths just enough to cause slumping.
Why horsehair? We are all familiar with the use of fibres in glass reinforcing. The concept is not new. The system of fibre reinforcing has been around for millennia and is a binder in what is a material that will shrink during the drying/carbonization process. Nowadays both horsehair, yak hair or resin fibre are used.Resin fibre is not used in Grade 1 listed buildings.
The lime mortar consisting of one-part coarse putty lime which would have been created by the lime kilns of the day, i.e. impure limes with elements of the firing material (charcoal and lime grits) entrapped in it and two parts rough sieved river sands added. With various other sands and floor sweepings all viewed as “stuff”.The first coat was applied and trowel forced onto and through the lath gaps to form a series of squeezes that slumped over, gripping the lath work in the process – a most effective system that when carried out on both sides of the timber frame also formed a very good sound barrier due to the irregular surfaces within and the entrapped air pockets in the mortar when dry. A fact lost to antiquity as, these days. we install irregular surfaced foam to attempt a recreation of what was, a very effective product in the 19th century.
The second coat of plaster was applied with less hair after approximately four days allowing the pricking coat to tighten/carbonate. The finished wall might deviate sometimes slightly from the true flat as can be seen on many walls of this period.
This was usually caused by the timber work drifting over time and/or plasterers of the period being pursued to finish the work as soon as possible. However, the quality of their efforts were amazing and still stand testament to their skills. The final coat consists of very fine silica sands This was achieved by working dried sands through a hair sieve, usually created with a horse tail stretched across a frame, mixed at a ratio of 1-part sand 1-part putty lime, which was also refined by the same method and trowelled in two or three coats over the render. This was then water flashed, worked up with a float to a fatty mixture, drawing the putty lime to the surface, thereafter face worked with a steel trowel.
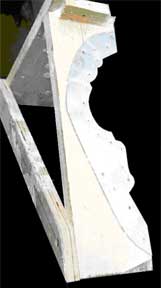
Skirtings
The way these classical skirtings were made is well demonstrated here. Run in situ, worked in as many as 6 coats, with the coring coats in hydraulic lime and haired mortars onto a rough lathed form. Face run in a tough hard-wearing alpha gypsum, casting plaster mixed with silica sand.It was as demanding and time consuming as it looks to make.
However, the benefits over wood were many. It had no joints or warp, no knots, could be run around tight external curves and up into stair stringers. It was easy to maintain and paint, tough against knocks and, at a time when wood was moulded with special hand planes, cheaper.
No one worried about the knees of the plasterer and once painted, the material was not discernible from wood.
Then along came the vacuum cleaner with the heavy suction heads of these contraptions carving chunks out instead of just bruising.
Tools
The tools of these trades at the time were equal to the products found today due to the skill of the blacksmiths of the day. All tools were handmade often to the specification of the craftsman and with his initials stamped into the metal.
* All other photographs and text by Neil England
3.STUCCO
As a building material, stucco is both durable and weather-resistant and traditionally used as both an interior and exterior finish applied in one or two thin layers directly over a solid masonry brick or stone surface. The finish coat usually contained an integral color and could be textured or marked with lines as it is here. ‘Stucco’usually refers to a coating for the outside of a building and ‘plaster’ to a coating for interiors; the material itself is often similar. Both consisted of the same primary materials: lime and sand (which are also used in mortar). Animal or plant fibres were often added for additional strength. Then with the introduction and development of heavy timber and light wood-framed construction methods, stucco was adapted for this new use by adding a reinforcement lattice, or lath
4.BRICKS AND MORTAR
The majority of the bricks used in the construction of the houses on the Estate were made on site. A number of builders would get together, set up a kiln and make enough bricks for their requirements. These were the red bricks made of local clay. The yellow bricks bricks used on the facades were made at Piddinghoe where a paler clay was available.
Rent was payable to Kemp for a site to set up a kiln and manufactory, and for the right to dig for the brick earth and the chalk available on his land, needed to make mortar
. (It was far more economical than to buy or make bricks elsewhere and transport them to the site using expensive horsepower. (There was no harbour at Brighton where such a cargo could be delivered and unloaded.)
5.BUNGAROOSH
While the front parts of the houses were built of brick, the rear parts incorporated large quantities of bungaroosh.
Bungaroosh was manufactured in direct response to the heavy brick taxes of the time and used almost exclusively in Brighton and Hove. Shuttering was erected and the space enclosed packed with a mixture of flints, cobblestones, broken bricks, wood offcuts, lumps of chalk ( clunch ) and any other rubbish available. Hydraulic lime, a mix of lime, sand and water, was then poured in to fill the remaining space and allowed to set. Once the shuttering was removed the exposed surfaces could be rendered and painted.
Bungaroosh although solid is not a very stable material. Water or extreme dryness can cause it to move or even crumble compromising the entire structure of a building. A common maxim states that much of Brighton “could be demolished with a well-aimed hose”